


| Story Views | |
| Now: | |
| Last Hour: | |
| Last 24 Hours: | |
| Total: | |
Cheese #11, The Recipe

This blog post is for those of you who were interested in how I made Cheese #11, my first repeatable cheese. For those of you who didn’t read that post, that means that from last summer’s beginning cheese making efforts, number 11 was the first one I want to try to make again. I’ve taken plenty of pictures, will give you the original recipe, as well as my variations. The recipe is based on the hard cheese instructions from The Little House Cookbook, by Barbara M. Walker.
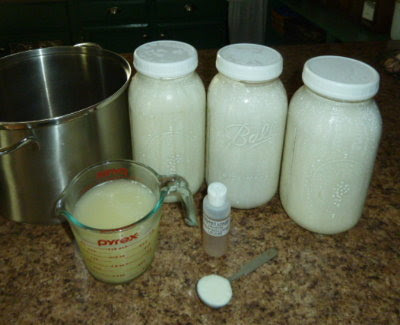 |
| Ingredients for Cheese #11 |
Ingredients for the cheese:
- 1.5 gallons (6 quarts) of raw, whole, goats milk
- 2 cups whey. This was from a previous batch of mozzarella
- 1 tbsp. whole milk yogurt (homemade from goat milk)
- 1/2 tsp. liquid rennet dissolved in 1/4 C. *water
- salt (I used 1.5 teaspoons, which is a scant amount I think)
[NOTE: Ultrapasteurized milk does not work for making cheese. The protein molecules have been altered and are about useless for anything other than extended shelf life. If using boughten milk, you either need raw or regular (not ultra) pasteurized.]
Ingredients for the brine: (prepared ahead of time. Can be reused.)
- 1/2 gallon whey
- 1/2 gallon *water
- 1 pound salt
*We have city water so I filter ours for drinking and cooking. Rennet in particular, does not work well with chlorinated water. If needs must, tap water can be allowed to sit for 24 hours, to evaporate the chlorine.
1. Ripen the milk. Mix yogurt with whey and blend thoroughly in milk. Heat slowly, over about half an hour, until it is wrist temperature (88 – 90° / 31 – 32° C).
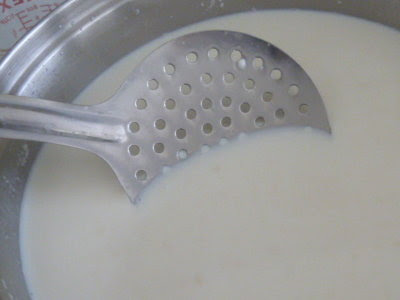 |
| A skimmer like this one is my favorite cheese making tool. I pour the rennet through the holes, which helps disperse it thoroughly and quickly. |
The object here is to lower the pH of the milk, i.e. acidify it a bit. I’m using whey and yogurt as my culture, but buttermilk could be used too. Technical cheese makers use thermophilic, mesophilic, chevre, feta, etc., cheese cultures. They might also use a pH testing kit or pH meter.
2. Set the milk. Mix the rennet solution and add to the milk. Stir for 2 minutes, to make sure it is well mixed. Remove spoon and allow to set, about 30 minutes. When the milk is set, you will get a “clean break” in the curds when you insert a knife.
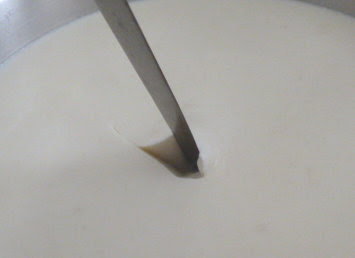 |
| “Clean break” is when a clean cut can be made in the curds with a knife. |
3. Cut the curd. I use a long knife to cut the curd. It’s supposed to be cut into one inch cubes. Ha.
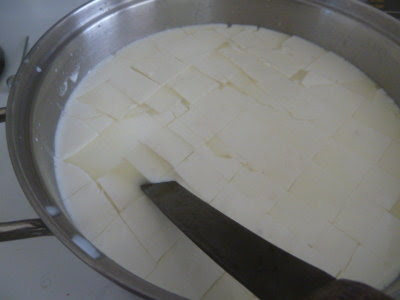 |
| The curd is cut at an angle like this, to hopefully get 1 inch cubes of curd |
4. Heat the curd slowly (over 30 minutes) to 105° F / 40° C. It will be hot on the wrist. This is sometimes referred to as “cooking” the curd.
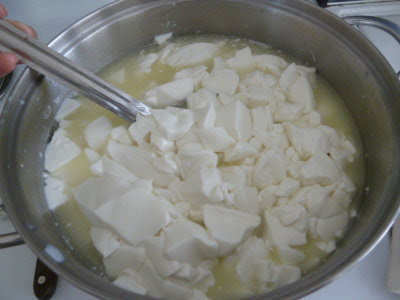 |
| The curd tends to clump & stick together during heating, so it must be stirred gently but continually. |
Allow to sit for about an hour, or until the curds are “squeaky” when chewed. This is the step I forgot when I made cheese #11, so I skipped it this time around too.
5. Drain the whey with a colander lined with cheesecloth. There will be a lot of it.
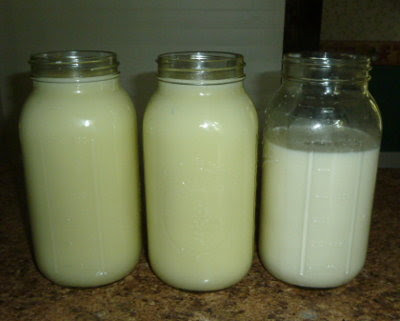 |
| Whey leftover from making the cheese. See below for what I do with it. |
The two half-gallon jars on the left are filled with whey first drained from the curds. The jar on the right is whiter; it includes about a cup of whey squeezed out by the press. (Looks like it contains some of the cream as well. The cream will rise to the top of this jar, and I will skim that and save for making butter.)
6. Salt the curds. Just mix in the salt with your hands.
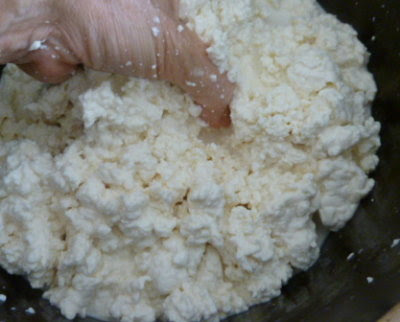 |
| Mixing in the salt. The cheese will resemble cottage cheese at this point. |
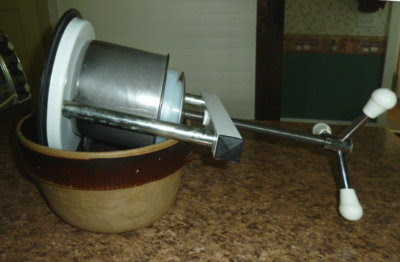
7. Mold & Press the cheese. I do not have a cheese press proper. What I do have is a tincture press (originally a wine press) that I thought I could adapt with a cheese mold and follower from a cheese making company. After experimenting, I would not recommend it, and I have added a real cheese press to my wish list.
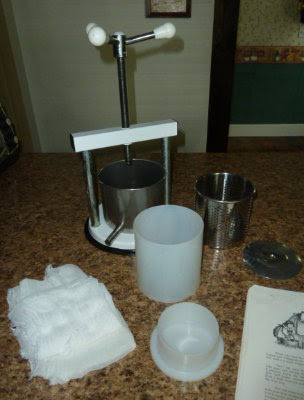 |
| Tincture press, cheesecloth, cheese mold & follower |
Line the mold with cheesecloth. The cheap kind from the discount or fabric store does not work. It’s too flimsy and open. Real cheese makers cheese cloth (aka butter muslin) works much better, and lasts longer. It can be washed, bleached, and re-used.
 |
| Because it’s a tincture press, it has a spout for draining the tincture. To get the remaining whey to drain, I have to tip the press like this. |
Pressure should be fairly light for the first time. If not, the soft cheese is squished through the cheesecloth, making it difficult to remove and keep clean. The cheese is removed from the press and cheesecloth every half hour or so to turn. This helps to keep the cheesecloth from sticking to the cheese. Pressure can be increased after each turn. Technical cheese makers sometimes use a pressure regulator.
Once out of the press I weigh it for my records.
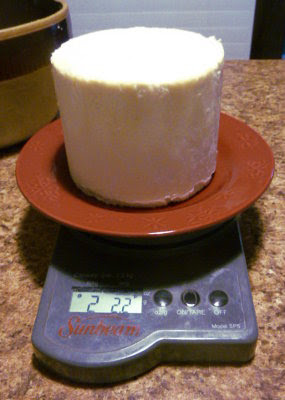 |
| I weigh each cheese fresh out of the press. I will weigh again after it has developed it’s rind. |
This cheese looks pretty uniform. Often they are lopsided because of my rigged cheese press. You can see it weighs 2 pounds, 2.2 ounces out of the press. The original Cheese #11 weighed 1 pound 14 ounces, though I’m not sure why the difference. Last year I used Nubian milk, this year it’s Nigerian Dwarf milk. Could breed make that big a difference???
Dress the Cheese. At this point, the Little House Cookbook instructs to dress the cheese by trimming, dipping in hot water, and smoothing with a knife. Since I didn’t include this in my notes, I didn’t think to do it. Smoothing the cheese does make it easier to dry and wax however.
8. Brine the Cheese. This step is not in the cookbook, but is a common technique. I used the brine solution I’ve been using for my mozzarella. It can be saved and reused quite a few times.
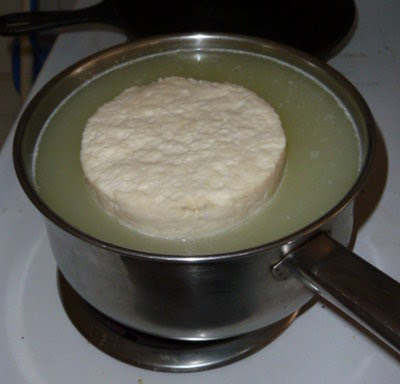 |
| Freshly pressed cheese in the brine to salt it. |
The brine should heated to about room temperature before adding the cheese. It’s left in the brine for about 2 hours, turned every half hour. Then its’ removed, dried, and left to form a rind.
9. Let the rind form. This is the step I’m at now. It’s cool enough now that I shouldn’t have a lot of problems with it getting moldy. Any mold that does begin to develop on the cheese, can be rubbed off with a clean rag dipped in vinegar and salt. I have to cover mine with an old cotton dishcloth, to protect from fruit flies.
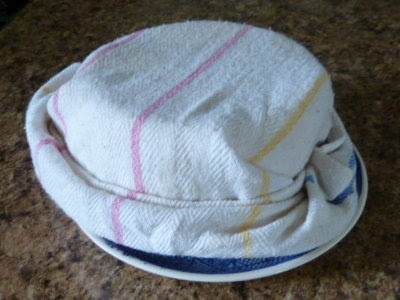 |
| The green cheese is wrapped & allowed to air dry to form a rind |
Out of the press, the cheese seemed tall, but it will settle down a bit as the surface dries. Last year it took about a week for the rind to develop. Once the entire surface is dry, I will weigh it a second time for my records. Then it will be waxed and stored in the warmest part of my fridge. The instructions call for letting it cure for at least 8 weeks before eating. The longer it’s stored, the sharper the cheese will be. Cheese #11 was a year old by the time we cut into it, so it was fairly sharp. We’ll cut into this one as soon as my other cheeses have been eaten.
What do I do with all that whey? Some of you may be wondering about all that whey! Whey retains about a third of the calcium and protein of the milk, so it’s too valuable not to keep and use.
- Obviously it can be used as a starter culture to make more cheese.

- Make ricotta cheese. I make this if I have time. Add about a quarter cup cider vinegar and heat to 200° F / 93° C. Ricotta doesn’t keep well, so unless I have plans for it (lasagna or cheesecake) I don’t always make it.
- Since reading Nourishing Traditions by Sally Fallon, I have been soaking grains and whole grain flours overnight with a bit of whey, to neutralize the phytic acid. This increases digestibility and availability of grain nutrients, so whey is something I cannot be without.
- Use in place of water or milk in any recipe that calls for it: bread, pancakes, gravies, as a soup base, etc.
- Replace part of the water when reconstituting juice
- Use to make lemonade
- Use in lacto-fermenting. Another idea from Sally Fallon. We’ve found we prefer the taste of sauerkraut, sauerruben, pickles, etc if the brine contains a bit of whey.
- Sourdough starter, when making a fresh batch
- Homemade soda pop, i.e. lacto-fermented herb teas and juices, made with whey
- Homemade mayonnaise. I recently found directions for lacto-fermented mayonnaise at Sarah’s Musings. The addition of whey increases the shelf life (in the fridge of course).
- Feed to cats, dogs, chickens, pigs, etc. They love it!
- Water plants like liquid fertilizer
- I’ve also read of experiments using whey as a spray for plant diseases. This is something I would like to experiment with myself.
If you have any questions, ask away. I’m still very much a beginner at cheese making, so I may or may know be able to answer them.
2012-11-27 10:26:05
Source: http://www.5acresandadream.com/2012/10/cheese-11-recipe.html
Source:
