


| Story Views | |
| Now: | |
| Last Hour: | |
| Last 24 Hours: | |
| Total: | |
5 Ways to Take Your Caffeine Off the Grid

From Survival and Beyond

By Nancy Smith
Imagine that you had to give up coffee – cold turkey – starting tomorrow morning. When the lights go out one day in the future, and whatever happens does indeed happen, most of us aren’t going to want to give up coffee suddenly. And instant coffee, for many of us, just won’t cut it – especially in a stressful situation.
If you are a coffee drinker, now is the time to take a very important preparation: start making your coffee today like you would in that scary “tomorrow.” Now, I don’t mean you should go out on your back porch in your slippers and blaze up the wood hacked from your desk to start a fire and make some wild-harvested chicory brew. Instead, what I suggest is that you set your coffee procedure up today to be able to move into a world without power with ease.
Here’s 5 ways that will help you move from totally grid-dependent coffee to partially grid-dependent coffee, which will transition into off-the-grid coffee should the worst case scenario happen. The bonus: these are really tasty ways to prep.
1. Unplug Your Coffee Pot For Good
 Get rid of it. Unless you have a bad-ass solar energy solution that will survive an EMP blast (and I know some of you folks do), your plug-in coffee pot won’t be helpful. When this dawned on us a few years ago, I did a ton of research on stove-top coffee pots. My first solution was a camp-style percolator. That was nice, but the coffee could be bitter and a bit chewy for my taste – not something for every day. Then, I went back to my old standby: the french press. But again, the coffee was too sludgy for me. My tastes have refined a bit as I get older, and while I like my coffee bold, I also like it free of grounds.
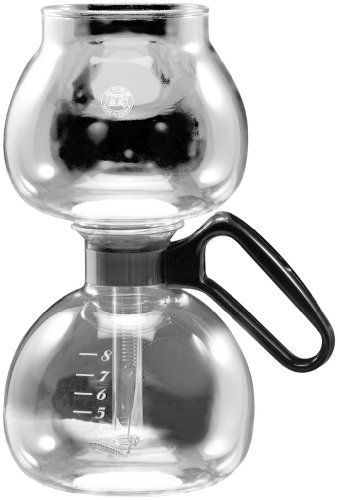
So the solution I found and one we’ve been using now for over year is a coffee “siphon”. The siphon makes for a clean, full-bodied cup of coffee, free of sludge. Here’s why it’s awesome:
- Coffee can be made on any type of stove, including an outdoor one.
- There’s no contact with metal or plastic.
- It’s easy to use and get really clean (have you ever successfully cleaned your plug-in pot???).
- The coffee tastes nearly as good as it smells while brewing, which has eluded me in previous brewing solutions.
- The coffee siphon we chose is easily less than 1/2 the price of a nice plug-in pot.
Since we make this every day, I’ll write a post soon that details our process. But for now, here’s how it’s done:
- Grind coffee to medium ground (finer will result in stronger coffee).
- Put the coffee in the top of the carafe, fill the bottom with water.
- Set the pot on to boil. As it boils, the water will move to the top of the carafe. Give it a quick stir and remove from heat.
- The coffee will siphon back to the bottom of the carafe after a few minutes, leaving the grounds in the top and leaving you with perfect coffee.
I bought mine at Amazon. The packaging was neat and tidy and everything was intact. The reviews of this really helped me learn how to make the coffee, too.
2. Buy Coffee in 5lb Bags

Storing roasted coffee can be difficult – the oils on the surface of the bean can go rancid easily, and will produce a not-so-fresh cup of yuck if you’re not careful. And I’m not a proponent of keeping it in the freezer – it just never seemed to keep it fresher for me, just colder. But the solution I’ve found this year lies in buying it correctly – and for us, that’s by the 5lb bag. My experience has shown that keeping coffee in its factory-sealed bag helps keep it longer.
I buy 2 bags of this every 3 months, with 2 bags in reserve. They have not gone bad. I keep them in a gasket box in a cool, dark place in my food storage. When I open one, half of it goes into a “working container” that we draw from daily, and the second half gets put in an airtight storage container and gets put back into food storage.
I’m burying the lead here a bit, but I have to say that the most exciting part is the price. We found a brand at Amazon that works out to be just over $7/lb (you have to order it on the subscribe-and-save program on Amazon to get this price). The coffee is very high quality, and buying it this way saves us quite a bit. It’s been perfect.
This method of purchasing and storing coffee will get you over any short-term emergency. But for the long term, there’s a different solution: green coffee beans.
3. Store Some Green Coffee Beans for the Long Term
Green coffee beans are coffee beans that have yet to be roasted. Because they’re still green, they store like a dream in Mylar bags. I’ve heard of folks storing this for 20 years and still drinking it just fine. Your mileage will vary, but it’s a very important part of my long-term preparedness plan. You can roast them easily in an old-fashioned popcorn popper – a Whirley Pop is our favorite – over any stove top.
4. Get an Old-Fashioned Popcorn Popper

You may already have one of these in your cupboard. If you use it for popcorn often, then you may want a second one just for coffee (so as not to mix flavors). Our favorite, the Whirley-Pop, can be used on any stove, and the procedure for roasting using this couldn’t be simpler:
- Place about 1/2 lb beans in the bottom of the popper;
- Turn heat to medium-high;
- Rotate the handle to agitate the beans.
- As you do, the beans will go from green to yellow, and then brown and start to crack and make popping noises. This is the “first crack” stage. Then, your beans will darken and crack again (“second crack”). Stop there (as you become experienced, you can keep roasting to your liking).
- The key is to cool them off quickly. Toss them in a colander and fan them to cool them down. Once room temperature, allow 24 hours before grinding, so that the gasses from the beans release and the flavor develops.
5. Grind Baby, Grind!
Grind up your beans with a hand grinder. Get a modern one instead of one of those lovely antique ones you see at flea markets. Antique coffee grinders can be problematic: they’re old and the mechanisms can be tough to turn and the millstone may be bad, etc. The last thing you want to do after you’ve stored coffee for an emergency is to have to deal with a tool that doesn’t work.
I don’t recommend that you use a hand grinder daily, but make a habit of using it once a week. That way, should the time come that you need it, you’ll be comfortable with it. It’s a great device to take camping, too. It’s small, so it packs well, and it’s easy to find a little spot in your kitchen for it. After much research, I bought the Kyocera ceramic mill on Amazon because it had great reviews, is easy to clean, and it’s easy to turn and grind.
So consider making your coffee in a new way. If you set yourself up to make coffee without electricity now, then it’s going to be much easier to do in the event of no power at all. And the benefits of saving money and getting better-tasting coffee will be realized with your first cup.
Are you brewing coffee in a electricity-optional way? Drop me a comment and let me know!
Photo Credit (vintage ad): CoffeeGeek via Flickr
Learn More at: Prep Happy

Light My Fire Titanium Spork
by Light my Fire ![]() (306) Buy new:
(306) Buy new: $16.99 $11.59 47 used & new from $11.38
Read More at Survival and Beyond
Source: http://www.survivalandbeyond.net/5-ways-to-take-your-caffeine-off-the-grid/
