

| Online: | |
| Visits: | |
| Stories: |

5 Ways To Preserve Milk For Survival And Homesteading

 Milk is packed with calcium and protein and is also a necessary ingredient in many recipes. It’s something that you’ll want to have on hand in a survival situation. However, milk doesn’t keep long, especially if you don’t have any means to refrigerate it.
You definitely want to include milk in your emergency storage. Maybe you have a milk cow or goat that produces more milk than you can use before it goes bad. Since cows and goats both have drying out periods so you’ll want to preserve milk for then, too. But what can you do to make it last?
Today we’re going to talk about several methods of either preserving milk as-is or converting into other products that store for longer periods of time. Before we get started, we’d like to offer a few tips.
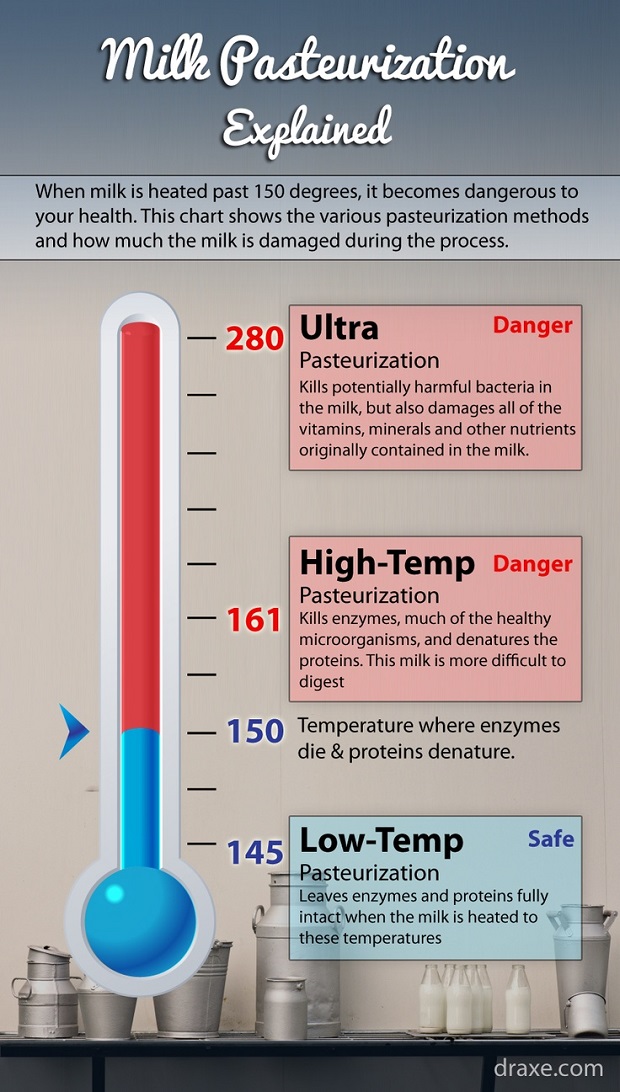
Before you start any preservation methods at all, pasteurize your milk. I know that many people prefer to drink their milk straight from the cow but the idea behind preservation is to keep bacteria from turning the milk bad. If you filter and pasteurize it, you’ll be starting with “clean” milk that will be more likely to keep longer. This is, of course, up to you but I advise it.
Salting
Salting is important to the preservation of anything and that includes your milk products.
Though you probably don’t want to salt your milk before you can it, you definitely want to salt your butter, cottage cheese and other products.
This will not only help them last longer but will also give you access to a food in your emergency food supply that has that necessary mineral (and flavor enhancer) in it.
Dehydrating
If you’ve dehydrated other foods, it may have occurred to you that you could do the same with milk. As bad as I hate to burst your bubble, it’s not so easy to do if you want to preserve the flavor and nutritional value. You also need to have special equipment such as an atomizer that won’t come cheap. You will also need a ton of milk just to yield a pint of dehydrated milk. Skip this idea and just buy powdered milk.
Freezing
Yes, it’s entirely possible to freeze milk but I recommend not doing so for a couple of reasons. First, if SHTF you probably won’t have the electricity to keep the freezer running so your milk will go bad within a couple of days, especially if it’s hot outside.
Second, frozen milk is fine to use but it often gets a grainy texture to it. It separates out but that can be dealt with just by shaking it up. Still, the texture thing is an issue and is the main reason that I don’t recommend freezing it for everyday use.
Canning Milk
We’ve discussed canning in other articles but many people don’t realize that milk can be canned, too. Just as with all canning procedures, it’s imperative that you make sure that your jars and seals are super clean. Warm your seals if necessary in order to get the best seal possible.
To can milk, start with extremely clean milk. Clean the udder, the buckets and all the equipment in addition to the jars. As I already stated, I recommend pasteurizing, too. At the very least, strain it well using a milk sieve or several layers of clean, lint-free cloth such as cheese cloth. Pour the milk into a clean bowl and cover it so that nothing gets into it while you’re prepping the jars.
Wash your jars in hot, soapy water and rinse them well. Keep them submerged in hot water until you’re ready to use each them.
Fill each jar with milk, leaving a half-inch at the top for headroom. Clean the rims of the jars thoroughly and put the sterilized hot rims and rings on them. Put them in your pressure canner and fill with the recommended amount of water. Place the canner over the hottest part of the stove, on about medium.
Bring the pressure to 10 and cook quarts for 25 minutes or pints for 20 minutes. Make sure the pressure stays at 10 or else you’ll need to start the time over.
The reason that I gave you directions for using a pressure canner is because milk is a low-acid food and is therefore susceptible to botulism found in the soil. Pressure canning brings the milk up to a safe temperature and holds it at that temperature long enough to kill any bacteria.
Canned milk will keep up to 2 years and is great for cooking and even drinking though the color will change. It will have a slight caramel color and may taste a bit sweeter or just cooked. Canned milk is great for any recipe that requires milk; however, you can’t make cheese, yogurt or rennet desserts from it because the milk won’t clabber.
Condensing Milk
One of the problems of storing canned whole milk is space. Even though you can buy canned milk at the store, there’s no guaranteeing what goes into that milk. Also, there’s no need to waste all of that fresh milk that you’re getting from your cows or goats on a daily basis. That’s where condensing your own milk comes in.
Evaporated milk is simply whole milk that has had about 60% of the water removed from it and you can do it at home as long as you pay attention. Here’s an easy way to do it.
Start with 4 ½ cups of milk. Feel free to double or triple this if you’d like, then do the math for the process. It’ll work just fine.
- Pour two cups of the milk into a heavy-bottomed pan.
- Stick a wooden spoon into the milk, holding it straight up and mark where the milk level is.
- Pour the rest of the milk into the pan.
- Bring the milk to a simmer, stirring every couple of minutes to make sure that it doesn’t singe.
- Remove the skin that forms as the milk reduces.
- Use the spatula to measure your progress. When the level of the milk reaches the mark you made, the milk has reduced 60 percent and is done.
- Allow to cool then follow the canning procedures described above for canning whole milk.
Evaporated milk can be reconstituted by adding equal amounts of water to it or it can be used as-is in recipes such as puddings or to give coffee, tea or cocoa a rich flavor. It keeps about as long as regular canned milk does and takes up half the space.
Sweetened Condensed Milk
OK, I’m going to admit to a weakness here; this stuff is so delicious to me that I can quite literally eat it right off the spoon. However, it’s starting to get a bit pricey in the store and, once again, you don’t know for sure exactly what’s in it.
An advantage of having sweetened condensed milk in your stockpile is that it provides a means of sweetening your foods without storing extra sugar that ants and other rodents are so attracted to. It’s also a source of fat when you may need it and you get the calcium boost from the milk and butter.
Finally, sweetened condensed milk is great for making a number of desserts and can be reconstituted to replace the milk and sugar in a recipe in a pinch. Oh yeah, and it’s a piece of cake to make because there’s a bit of wiggle room in the ingredients.
To make sweetened condensed milk at home, you’ll need 1 1/2 cups whole milk, 1/2 – 2/3 cup sugar depending upon how sweet and thick you want it, 3 tablespoons of butter (no substitutions here!) and 1 teaspoon vanilla, which is optional. Again, feel free to double or triple the recipe if you’d like. An interesting take here is that if you’d rather use honey than sugar, you can! Just substitute in equal amounts.
- Add 1 cup of the milk to a heavy-bottomed pan.
- Using a wooden spoon, mark where the milk comes to in the pan.
- Add the sugar or honey.
- Bring to a slow simmer over low-medium heat, stirring frequently to prevent burning.
- When the liquid reduces to the level that you marked on the spoon, remove from heat.
- Add the butter (which, by the way, is optional if you want to keep it low-fat) and the optional vanilla and whisk well until combined.
- Allow to cool and then can to preserve as described above. Since you’ve already simmered the milk for a considerable time, you can use a traditional canner or a pressure canner.
These are about the only things that you can do to preserve milk if you want to keep it milk. There are, however, a few other options.
Making Cheese
There are about a million different cheese recipes out there that you can make depending upon your personal preferences and the type of milk (goat or cow) that you’re using. Cheese is a lot easier to make than you’d think and it keeps for practically forever without refrigeration.
Since I have no idea what kind of cheese you prefer, I’m going to tell you how to preserve it instead. You coat it in wax. If you’re going to do this though, you need a special cheese wax because paraffin wax will crack as it dries. That will allow bacteria to get into your cheese, which defeats the purpose of waxing it at all.
Hint: Once you use a pan to melt cheese wax, you’re not going to be able to cook in it again because the wax won’t come completely out.
- Begin by melting the cheese wax over low-medium heat.
- Cut your cheese into chunks that you’ll use within a few days.
- Once the wax is melted, brush it over your cheese using a boar’s hair bristle brush; this will often come with the wax.
- Be sure to coat the cheese all over; you don’t want to leave any spot bare because bacteria will get in.
- The wax will harden in about 30 minutes. Hang it in a mesh basket or some other place where it won’t be exposed to water or heat then hang it in a cool, dry place.
Waxed cheese will last up to 25 years but remember that it will age and become sharper so if you plan to store it for an extended period of time, start with a mild cheese.
Video first seen on Outdoor Cast Iron Cook
Making Butter and Buttermilk
If you have cows or goats, you most assuredly know how to make butter. However, did you know that you can CAN butter? Many people don’t but it’s absolutely possible to do. I prefer to can either a jelly jar or a pint jar of butter because that’s all we’ll use before it goes bad but feel free to use quart jars if you’d rather.
As usual, start with clean, hot jars and get your rings ready, too.
Hint: 1 pound of butter makes just a little more than a pint so if you’re using jelly jars, you’ll have a bit more than 2 jars.
Use this method to calculate how many jars you’ll need.
- While your lids and jars are heating, bring the butter to a slow simmer over low-medium heat. Simmer for about 5 minutes, stirring from the bottom to the top to keep it from separating too much. This simmering process is to get more of the water out.
- Prepare your jars and ladle the butter into the jars leaving about 3/4 of an inch headroom. Scoop from the bottom up each time and keep stirring the butter before you scoop so that you get more than just the oil on top.
- Carefully wipe the rims of the jars and add the lids and rings.
- Set aside and allow the seals to seal.
- Once you start hearing the lids “pinging” as the seal, check the temperature of the jars.
- When they’re cool enough to touch and the lid has pinged down, shake the jar to mix the butter back up; it will separate during the process and be foamy on top and whitish on the bottom.
- Continue to shake every 5 minutes or so until the butter stays the correct consistency and stops separating.
- Canned butter can last up to 3 years and I know people that have used it up to 5 years after canning it with no problems.
- Store in a cool, dry area – this is critical!
If you’d like, you can also make yogurt, sour cream or cottage cheese but storage methods for those are just simple refrigeration. It will extend the life of the milk for a couple of weeks, though.
I’ve also heard rumors of canning buttermilk. Though the concept seems viable considering buttermilk is extremely acidic, I’ve never done it myself. If you have, or if you have any other good ideas about using and storing milk or milk products long-term, please tell us about your experience in the comments section below.

This article has been written by Theresa Crouse for Survivopedia.
8 total views, 8 views today
[Total: 0 Average: 0/5]
“Visit Survivopedia.com – a growing encyclopedia for survival, your
ultimate source of uncommon wisdom for dangerous times.”
Source: http://www.survivopedia.com/how-to-preserve-milk-at-home/
