

| Online: | |
| Visits: | |
| Stories: |

| Story Views | |
| Now: | |
| Last Hour: | |
| Last 24 Hours: | |
| Total: | |
How to Build PVC Cold Frames

Visit Tactical Intelligence to download the free ebook, “The 5 Most Crucial Components of any Serious Survival Plan
The following article is a guest post by Bill from upstate NY.
In this article, I will be demonstrating how you can build a cold frame, which is like a mini greenhouse for the garden. It will allow me to plant my vegetables a couple of weeks early and keep them growing a couple of weeks later in the fall. All of this is depending on where you live and what you are growing, of course. There are also many types of coverings you can use. Some plastic sheeting is thinner, some thicker and better for insulating. Some allow more light through and some are used to give cool growing plants shade so they can do better in warmer weather than they normally would. Each has a trade off.
Most people I know would rather scrounge around for used and about-to-be-discarded materials. Like a contractor who has just built a house and now has to pay to dump the scrap lumber and other materials he used. Many times, if you ask, he will gladly give you all the scrap lumber you want, as long as he doesn’t think you might steal anything. You can usually find old windows and frames in good shape, which are great for a do it yourself cold frame.
What I chose to do is use lightweight PVC for this project. Schedule 40, furniture grade in 3/4 inch (inside diameter). I used white to save money but you can buy them in all kinds of colors or even paint or stain your own. For the most part, hardware stores and places like Home Depot will stock all the PVC you need, but the connectors are more tricky to find.
You can try www.snapclamp.com for the fittings and some plans. More free plans can be found here www.pvcplans.com.
The cold frame I built measured about 26” side to side , 20” tall at the highest point and about 14” wide. That should be ok for a couple of plants with enough height to allow them to grow and not be too crowded. What I like about using PVC is that you can make things of any size quickly and as long as you don’t cement the pieces together, you can reuse the connectors and pipe in almost limitless variations.
I used a portable table saw to cut the PVC. The dust mask and safety goggles were used to keep the plastic out of my lungs and eyes. Even though this was a small project ,the amount of plastic “ dust “ generated was quite a lot . I cut it all inside for convenience but next time I’ll set up the saw horses and do it outside.
Here is an overview of all the pieces and tools to make this cold frame. There are several more types of PVC fittings available, but I wanted to make the cold frame inexpensive, so I used only 2 types of the fittings.
What You’ll Need to Build a PVC Cold Frame
Here’s a list of the parts I used:

- 3/4 inch (inside diameter) furniture grade PVC pipe (they came in 5′ pieces and I needed 17′, so I got 4 pieces which cost $16.00 and had 4 feet left over)
a) 3 pieces 24” long
b) 6 pieces 12” long
c) 4 pieces 10” long - 6 of the 3 way fittings ( $1.04 ea. = $6.24)
- 4 of the 45 degree angle fittings ( $1.31 ea. = $5.24)
- 10 snap clamps cut to 4” long. (I bought a 5 foot long piece and cut it myself, $5.00)
( note : I used snap clamps made for 1 “ PVC because the 3/4 inch size was too hard to work with) - 2.4 mil “grow tunnel” plastic ( A roll 6 1/2 feet wide by 25 feet long cost me $17.85
Total cost ( not including tax and shipping ) was $32.48 To make one bigger would cost very little extra.
These are the snap clamps. I bought them in 1 five foot long section and cut them into 4 inch pieces myself to save a little money. You can buy them pre-cut though. Note, I tried using the snap clamps made for the 3/4 inch pipe , but they were a very tight fit over the plastic. So I went up a size to 1 inch clamps , which were much easier to work with since I assembled the cold frame a few times to try various configurations. But , if you want a tighter fit use the 3/4 inch size. Just don’t plan on taking them off too many times.

How to Make PVC Cold Frames
Step 1: Assemble the bottom:
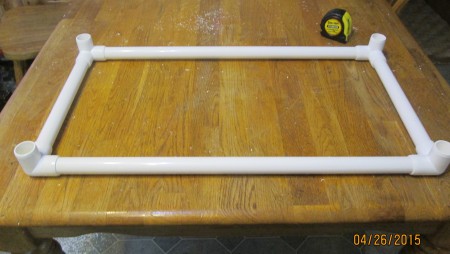
Step 2: Add the 45 degree fittings on top:

Step 3: Add the 4 pieces ( 10 “ long ) and the 3 way fittings that will allow you to attach the ridge piece.

Step 4: Add the ridge piece and drape plastic over structure

Step 5: Secure plastic covering
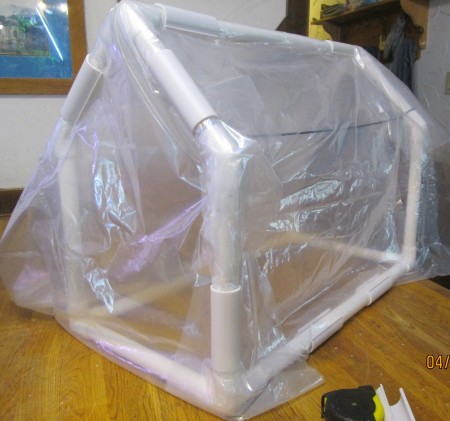
To make it a little faster and easier, I cut the plastic a little larger and just folded the excess under the snap clamp. Doing this saved a little time and if I wanted to re use the plastic on some other project later, the larger piece would come in handy.
I used a piece of paracord in between the ends to keep the plastic from pushing against the plants. I could not seem to find a PVC fitting that would allow me to have a section of pipe to be used for this, so when in doubt, use paracord.
Step 6: Finish by Securing the Lower Portions
To wrap the ends of the cold frame I just cut the plastic and folded it around the pipe and held it all in place with the snap clamps. If I had used the smaller 3/4 “ snap clamps this would have been difficult indeed to do.

Shown above is one side of the frame.
That’s it. This will keep you seedlings and plants quite a bit warmer and will prevent wind damage to young plants. It might be necessary to anchor it to the ground with a couple of tent stakes in windy locations.
Final Recommendations
In the summer, for cool loving plants, replace the plastic with a product called shade cloth. Basically a woven fabric that allows some light and water through it. It comes in various types , depending how much shade your plant needs.
Still, I would not keep the plant covered 24 / 7 . The whole frame weighs only 2 pounds or so, so I would lift it up so the plant can get some sun. For some types and sizes of plants, you might only need the cold frame over night.
In the spring, this will help the soil warm up a little faster and keep any light frost from hurting the seedlings, as well as discourage animals from eating you plants, up to a point. It will do a good job also, of holding humidity in.
As I said earlier, you can make almost anything using these materials. The whole thing can be disassembled and easily stored when not in use, as long as you do not cement the pieces together.
Look at the links I included to see many more ideas on how to use PVC.
Source: http://tacticalintelligence.net/blog/how-to-build-pvc-cold-frames.htm
