


The 5 Phases of Evasion

First contact
All I could hear was my heart pounding in my ears and feel the burn in my aching legs as the lactic acid crept in. We sprinted a mile or more straight up and over a tree-covered hill after nearly being ambushed at a potential recovery site. My teammate and I split from the other two in our squad in hopes of improving our odds and confusing our pursuers. We were now laying in an initial hide site listening to our back trail for any bad news, praying that we had a decent lead and hoping that we could buy enough time until the rescue team formed a plan and picked us up. Our new objective was to make it to the alternate rally point (still miles away through hostile terrain) without being captured. I wish that I could tell you that we made it without being caught, but the odds were heavily stacked against us. Helicopters with Forward Looking Infrared (FLIR), tracker teams with dogs and heavy enemy presence using night vision resulted in our eventual capture and torture after 6 days on the run in temperatures that dipped below freezing every night.
Thankfully, it was all part of an elaborate evasion training exercise conducted by the US Air Force for training new Survival, Evasion, Resistance and Escape (SERE) Specialists. That was almost 12 years ago and since then, I’ve had the opportunity to act as both evader and aggressor in numerous evasion training exercises. There are some key takeaways that I’d like to share as well as give you the blueprint for what the Air Force Survival School teaches all students who are considered “High Risk of Capture”.
There’s a multitude of reasons one might have to evade a pursuer, but we’ll keep it generalized and talk about some adaptations required for different environments as we go. Evasion is divided into 5 separate phases: Immediate Action, Initial Movement, Hole-Up, Evasion Movement and Recovery.
Immediate Action
Your first reaction may be to get moving, but you need to take a few seconds to sort out any major injuries you may have sustained and decide what equipment needs to go with you. This phase is extremely time sensitive and you’ll likely be task saturated on top of dealing with the shock of the event that led you to the decision to evade. Life threats such as arterial bleeding should be dealt with using expedient methods (i.e. tourniquet) until you have time to reassess and provide long-term care. Now is the time to recall your evasion plan of action and begin to enact it. You do have a plan, don’t you?
Grab any equipment you’re taking with you (go-bag, weapon, etc.) and if the situation dictates, hide any equipment that’ll be staying behind. Consider sanitizing yourself and equipment if you’re evading in a populated area where you’ll need to blend in. Regardless of what you see or hear in your immediate vicinity, always assume there is an enemy presence, keep a low profile and begin moving away from the threat and towards your initial hide site.
Initial Movement
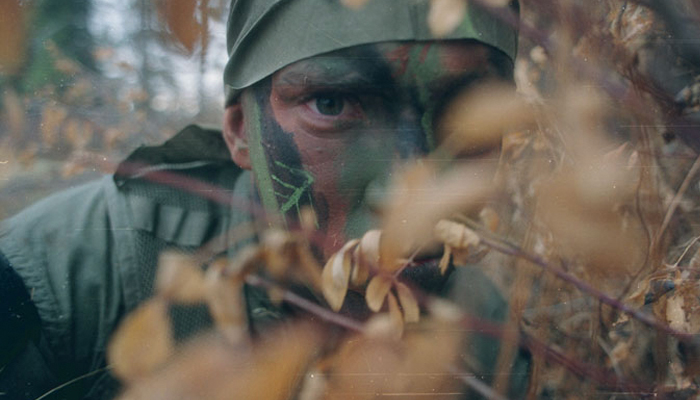
Your primary concern in this phase is to “get off the X”. Your physical condition, the environment, and any direct threats will dictate your speed of travel. The natural reaction would be to take off running and that may be indicated if you’re in a wilderness setting, but consider an urban evader bolting through a crowd that’s moving at a walking pace. He’s going to draw a lot of unwanted attention. To help you blend, you’ll also need to initiate some expedient camouflage. In the backwoods, rubbing some dirt on any exposed flesh and clothing will help break up your outline and reduce shine, but don’t stop moving! In a populated area, throwing on a hood, hat or acquiring some additional clothing can help provide some mobile concealment.
The main objective is to put three things between you and the enemy: time, distance and terrain. These barriers are the keys to effectively removing yourself from the danger. How far should you go? Just like your speed of travel, it’s going to depend on your condition/environment/threat. Keep in mind, moving in a straight line directly from A to B makes your direction of travel very predictable and easily ambushed by trackers that may be in radio contact with an assault team. A zigzag pattern will prevent aggressors from anticipating your route and it’s preferable to use the military crest if available. A military crest is a location two-thirds up a slope (one-third from the top). This allows you to use the terrain to your advantage and prevents you from silhouetting yourself on the top of the ridge. It also offers you a superior vantage point and affords you the opportunity to disappear over the ridge should the enemy start to close on your location.
In an urban setting, you’re less likely to find a military crest option, but you can certainly use physical barriers and terrain masking for mobile concealment (buildings, parking garages, houses, alleyways, etc.). Generally speaking, your route of travel should take you away from any lines of communication (LOC). In a rural environment, these are categorized as areas like roads, railways or bodies of water where there are locals and higher population densities. In an urban location, your best course of action will probably be to move towards a more rural location. Steer clear of LOCs like arterial roads, highways and major waterways during urban travel. Once you’re satisfied that you have sufficient time, distance and terrain on the enemy, it’s time to start looking for a suitable hole-up site.
Hole-Up
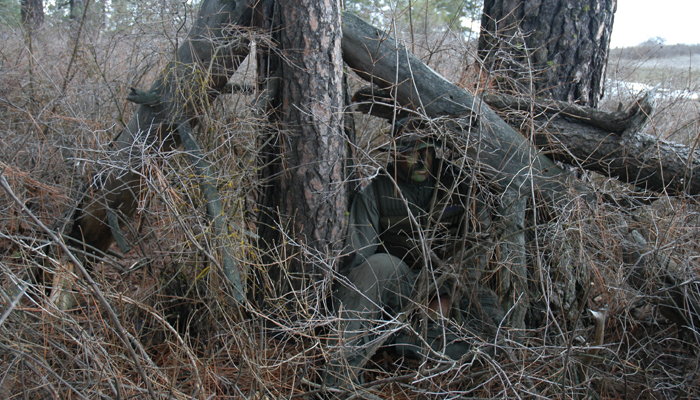
Your hole-up site needs to provide protection from the environment since you’ll likely be in this spot for quite a while. It also needs to be well concealed, so a delicate balance is required between a shelter that is awesome, but stands out like a sore thumb versus a shelter that is super obscure, but doesn’t protect you from the elements. The military developed an acronym to help evaders choose a hole-up site: (BLISS)
Blend– Looks like everything else around it (maybe add some camo to the shelter, but don’t overdo it)
Low-Profile doesn’t stand out and is near ground level (Swiss Family Robinson shelters = bad)
Irregular– Shape shouldn’t draw the eye so avoid straight lines (i.e. no poncho tied off with good pitch and tightness)
Small– Should be just big enough for you and your equipment
Secluded– The point is to stay hidden, so avoid setting up shop in high-traffic areas, but also don’t be the guy hiding in the only bush in the middle of a meadow!
The hole-up site should afford you multiple escape options; crawling into some hollow log or culvert is a bad idea. When approaching a potential hole-up site or even re-entering, use a wide sweeping J-hook approach to allow you early warning of trackers following your trail. This gives you the opportunity to escape before the bad guys roll up on your hidey-hole. Playing the “bad guy” during many evasion exercises, I’ve walked up on so many students in horrible hole-up sites that could see me coming and chose to stay put. This technique is only possible if you have an incredible hide site. If you’re fairly certain the enemy sees you, it’s time to get moving!
Your hole-up site will be a place that requires a lot of listening for and observation of the enemy; utilizing the military crest will be a huge benefit to the evader. If a radio is available, the military crest will provide a better location for line of sight communications, signaling potential rescue teams, determining location and planning possible travel routes.
This phase also allows you to further treat injuries, improve personal camouflage, inventory equipment, drink water and rest. Maintaining security will be a challenge for a lone evader as will overcoming the shock of the situation. Focusing on short-term goals like collecting water and food sources will keep the mind active and also prevent you from letting your guard down or becoming complacent.
Lots of people think that this is a great time to get a fire going, warm up and maybe cook some food, but they’d be dead wrong! A fire is a concession to comfort that puts you at extreme risk for capture. In addition to the smoke of a fire, the visual signal and smell can be detected from a great distance. A life-threating emergency is the only instance when a fire is acceptable. Not just, “I’m really cold and need to warm up for a little bit”. More like, “If I don’t get a fire going right now, I’m probably going to wake up dead”! It’s not within the scope of this article to cover the methods used for an evasion fire, but it needs to be very small, preferably below ground, using very dry hardwoods under a dense tree to disperse smoke.
So how am I going to cook food or purify water you ask? First off, you can go a long time without food and your primary concern is to avoid capture. The evader should rely on known edible plants and insects (six legs and three distinct body segments) for nutrition. This is no time to experiment with plants that you haven’t previously identified as safe. What’s worse than having to evade hungry? Evading with food poisoning while vomiting and diarrhea wreak havoc with your noise discipline (not to mention the accompanying dehydration). Water should be collected early and often; ideally from precipitation and obscure water sources (isolated puddles) and purified using chemical means if available (precipitation does not need to be purified).
If you can meet your needs in the hole-up site and wait out the enemy or wait for rescue, there’s no need for further travel which will only expose you to further danger and increase your odds of being captured. On the other hand, you may be forced to move to meet your needs, link up with rescue assets, or relocate without assistance to a safe location.

Evasion Movement
Slow, deliberate effort is the name of the game in this phase. Travel during periods of low light (dusk/dawn) and/or during inclement weather when tracks, noise, and visual observation are more concealed. Stop, look, listen and smell frequently to detect enemy or indigenous personnel prior to them seeing you. Fade away very slowly to the nearest point of concealment if you see someone, as quick movements will catch the eye. When acting as an aggressor during evasion exercises, my best tactics for catching students was to anticipate their direction of travel, then get out in front of them. I’d wait until I hear them approaching and close on them quickly. An effective way for an evader to counter this is by taking a “dog leg” (or indirect) approach to their intended destination.
Leave no evidence of travel as you continue to avoid LOCs while maintaining your noise and light discipline. Each “leg” of your movement will necessitate that you move from one point of concealment to the next. Stopping out in the open with your head down to check your compass is a sure ticket to failure!
We won’t go into detail on group evasion movement techniques, but each member should have a designated sector for security and know the rally point if the group is separated. All communication during group movement should use hand signals. Group communication is critical during travel since all members need the ability to silently alert the rest of the group to fade away if a threat is detected. Hand signals should be minimal and clearly understood by all evaders prior to leaving the hole-up site. You don’t want to signal your buddy that a bad guy is inbound and he thinks you’re telling him to steal second base! Once you get to where you’re going, find a new hole-up site, verify your location and determine what your recovery options are.
Recovery
The final phase of evasion is varied according to the circumstances triggering your event and what recovery mechanisms are available to you. Communication with the rescue asset and signaling them without alerting the enemy are the primary concerns in the recovery phase. Your job may be to observe and report enemy activity or other hazards to the rescue team. Secure your equipment and stay concealed until recovery is imminent. Keep in mind that this is likely a very intense event for the recovery asset so always assume a non-threatening posture, secure any weapons you have, make sure your hands are visible and follow their instructions to the letter. It’d be kind of ironic to get shot by the rescue team after a successful evasion.
Call to Action
Evasion is not one of those things we think much about until the chips are down. How many of you have spent a day or two on the run in the woods practicing it? It’s not too late! This is a skillset that you can become proficient in with some practice. I’ll be honest with you…it’s hard and depending on the weather it can be miserable!
The SERE proverb says, “Your worst day evading is better than your best day in captivity”. Keep up your physical fitness, know how your gear works, get to the woods and practice finding some hole-up sites. Maybe even practice some evasion movement using hand signals with a buddy. It can be fun if you scale it down and practice before putting the whole thing together. Albert Einstein said, “Adversity introduces a man to himself”. Probably better to learn who you are now before the SHTF!
**Editor-in-Chief’s Note: JD is the founder of iwillmakeyouhardtokill.com. His site is dedicated to a wide variety of skills that improve survivability in emergency situations as well as everyday life. He is a SERE Specialist with over 18 years of active duty service teaching aircrew and special operations personnel how to survive, evade, resist and escape at the U.S. Air Force Survival School located at Fairchild AFB, Washington.
The post The 5 Phases of Evasion appeared first on Preparing for shtf.
Source: prepforshtf.com
Source: http://prepforshtf.com/5-phases-evasion/
