
| Visitors Now: | |
| Total Visits: | |
| Total Stories: |

| Story Views | |
| Now: | |
| Last Hour: | |
| Last 24 Hours: | |
| Total: | |
Deconstructing My Adjustable Paracord Rifle Sling…Just for You
winonageek commented recently on my 550 Paracord Rifle Slings, “I love the idea for an adjustable paracord sling. Would you elaborate on how you made the adjustable sling? How did you connect the paracord and webbing?” So I thought I’d deconstruct it for him and anyone else interested.

After making my first paracord rifle sling, I attached it to a Ruger 10-22. Hum, nice fit, look, functional, and redundant cordage. But what if I wanted to adjust the length for, say, a shotgun, or a rifle? My wheels were spinning. Off to Wally World to find a cheap clasp.
I dug into my box of webbing and found a piece of 1 inch material about two feet in length. More digging produced a buckle thingy I used to connect the two loose ends of webbing.
I used about 80 feet of black paracord because, well, it’s the only color I had in a 100 foot hank that day.
Stuff you’ll need
- Paracord – about 80 feet – I use 100 feet ’cause I hate being too short at the climax of a project

- 1 inch x 28 inch webbing – more length depending on how many Twinkies you’ve put away
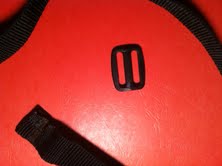
- Buckle thingy – Google is worthless on this one
- 2 sling swivels
- 1 buckle clasp – I used a 1 inch clasp to fit my webbing
Connecting the stuff
A.) Start your paracord on one sling swivel and the other end through the female part of the clasp. I loop the cord through four times on both connectors. That’s unnecessary for strength, but just looks better than two loops on the connectors. Do a basic cobra weave down the entire length starting at the clasp end. Once you reach the sling swivel, begin a king cobra weave (video link) on top of the previous cobra weave. I ran the king cobra weave about 20 inches and terminated the weave. The entire length of the paracord portion, from swivel to clasp, is about 24 inches. This measurement does not include the clasp and sling swivel.
Once you have the sling secured to the female clasp and sling swivel, it’s time to attach the webbing to the remaining hardware: sling swivel #2, buckle thingy, and the male end of the clasp. To save you the trial-and-error method and a load of frustration, follow these procedures closely.
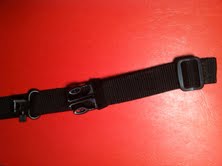
B.) I bent over about 1/2 inch of webbing and melted it to itself to create a “stop” for the buckle thingy. That step is probably not required. Then take the buckle thingy and feed the webbing through as shown.
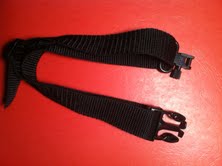
C.) Now you can feed the clasp (male end) and sling swivel #2 on the webbing. Make sure they both are facing out like the buckle pictured below.
D.) Take the loose end of the webbing and feed it back through the buckle – on top of the end already in the buckle. Your done. Adjusting the length is done by sliding the loose end to your liking. My sling is comfortable at around 38-39 inches end to end. Remember to use longer webbing for a longer sling.
That’s it. I’m sure there are better, more functional methods, but this is what I had on hand except for the clasp. I used Uncle Mike’s sling swivels that I already had in my gun cleaning box. I never throw away webbing. The buckle was poached from some other piece of equipment and slung into my paracord supply bag. My total cost was under $10.00. I know. If I had to buy all the supplies upfront, it would cost more. It pays to stock up and be a scavenger.

As always, if you have a better idea for making an adjustable paracord sling, don’t be shy. Please let me know how to improve this puppy. Don’t forget to share this Sherpa DIY project with others if you found any value in it.
Doing the stuff,
Todd
2012-12-18 12:22:49
Source:


